Deploying Haskell Programs
How to deploy a Haskell program?
You should use Docker only if you have a pre-existing container collection to integrate into.
Otherwise, for the lay-Haskeller (myself included), I recommend Heroku for deploying projects.
The Simple Way: Heroku
I just want to take a little server I wrote and throw it on the web somewhere.
Heroku is the free and convenient solution for this. It is a hosting service that allows pushes to a Github master branch to trigger redeploys, and it also caches dependencies so that subsequent redeploys are fast.
The cheapest tier of Heroku machines ("dynos") is free. These dynos sleep after 30 minutes of inactivity but reawaken quickly when called. Paid dynos don't sleep.
For some of what I describe below there is also a heroku CLI tool, but I found it unnecessary. Also included below are instructions for configuring a Namecheap domain to point to Heroku, so our app can be foobar.com instead of foobar.herokuapp.com.
Listening on $PORT
It is The Heroku Way™ for applications to listen for incoming requests on $PORT. This can conflict with local development workflows, but we can get around that with the following:
  {-# LANGUAGE DeriveGeneric, DeriveAnyClass #-}

  import qualified Network.Wai.Handler.Warp as W
  import           Options.Generic
  import           System.Environment (lookupEnv)
  import           Text.Read (readMaybe)

  data Args = Args { port :: Maybe Int
                     <?> "Port to listen for requests on, otherwise $PORT" }
    deriving (Generic, ParseRecord)

  app :: Application  -- Some `wai` Application

  main :: IO ()
  main = do
    Args (Helpful p) <- getRecord "Backend server for foobar.com"
    herokuPort <- (>>= readMaybe) <$> lookupEnv "PORT"
    let prt = maybe 8080 id $ p <|> herokuPort
    putStrLn $ "Listening on port " <> show prt
    W.run prt app
Local server runs are then:
Heroku Settings
Committing a Procfile
We need only a Procfile commited to our repo. This defines what command Heroku should run after it builds our project. Example:
web: server
Where server is the name of the executable as defined in .cabal. If the server takes other arguments, the Procfile might look something like:
web: server --js app.min.js
Settings through Heroku UI
All other config happens right in Heroku. We'll need both a Heroku account and a Github repo to link to.
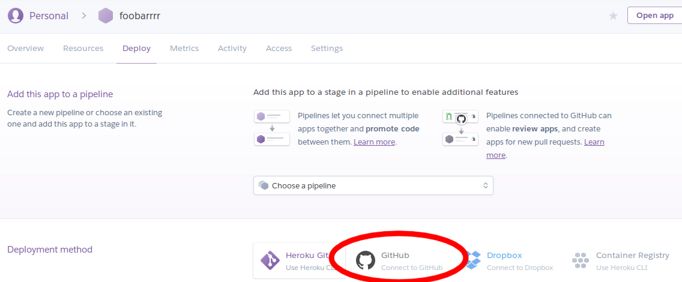
First, we create a new Heroku project through the UI. Once active, we should see the Deploy tab:

Ignoring the CLI instructions at the bottom, we choose Github as our deployment method, and connect our repo in the resulting UI.
Next, head to the Settings tab and find the Buildpacks section:

Buildpacks are script sets that Heroku uses to build projects of some language type. Click the Add buildpack button and enter the following URL:
https://github.com/mfine/heroku-buildpack-stack
This will allow ~stack~-based projects to compile while also caching built dependencies. Credits to Mark Fine, Joe Nelson et al. for their work in this area.
Deployment
git push origin master should be all we need. We can also force builds on other branches via the Deploy tab.
Connecting with Namecheap
Follow this StackOverflow post - it's what I used for this website.
HTTPS
Heroku handles HTTPS for paid dynos automatically via Let's Encrypt. For our Namecheap settings to cooperate, we must change (within Namecheap's dashboard) the Value field of each DNS record from:
yourappname.herokuapp.com
to (note the extension!):
yourdomain.com.herokudns.com
So for this site, I changed fosskers.herokuapp.com to fosskers.ca.herokudns.com. The changes will take time to propagate around the internet, but once they do you should have https://yourdomain.com working without any extra configuration.
The Container Way: stack and Docker
For a Haskell-only production environment, Docker is strictly unnecessary. However, if our production system is already dockerized or our project managers have succumb to marketing, stack can help us.
By adding something like the following to our stack.yaml:
  image:
    containers:
      - base: "fpco/ubuntu-with-libgmp:14.04"
        name: "foobar-server"
        entrypoints:
          - foobar-server-exe
and running:
our Docker image will build. We can then fit it in to our deployment system as necessary. See the official Stack docs for detailed information.