- Extracting Media from DVDs
- Plex on a Pi
- Installing Plex
- Mounting your External Drive
- Directory Layout
- Adding Libraries
- Copying Files to your External Drive
- Playback
- Conclusion
- FAQ
- How much can a Raspberry Pi handle?
- Why is Plex transcoding!?
- Why do UTF8 characters appear as boxes on my Roku TV?
- I added a subtitle file but Plex doesn't see it...
- Resources
From DVD, to Pi, to Plex
By Colin on 2020-04-11
This post describes my home media setup. Namely, how I rip and encode DVDs that I own using Handbrake, store them on a Raspberry Pi running Plex, and play them on my (Sharp) Roku TV. My encoding settings, media types, and subtitle formats are all chosen to avoid live Transcoding by Plex during playback, and allow reasonably high video quality.
Extracting Media from DVDs
I could never manage to convince my Chromecast to handle multiple audio and subtitle tracks correctly. Plex can handle these without issue, all while avoiding Transcoding if we set everything up correctly.
One aspect of this is subtitle type. It seems that keeping all subtitles as external .srt files is best, as this allows:
- Plex to avoid "subtitle burn-in", which causes live Transcoding.
- a better look to the subtitles while watching, since clients can freely manipulate text.
- the ability to add new subtitles whenever we want, just by coping a file.
- the ability to freely edit your own subtitles.
A note on opensubtitles.org: Yes it's possible to get loads of .srt files for free there. However, they're not guaranteed to have the exact timing that your particular DVD expects. So I personally think it's safest to use the subtitles supplied by the DVD itself.
"Lossless" Extraction of DVD Content
You'll need: makemkv and ccextractor.
I use the makemkv tool. This pulls everything off of your DVD and wraps it in the .mkv container type. Nothing is reencoded, so you're getting the content as-is. The movie file itself will also be quite large, usually more than 5gb. It will also almost certainly not be in a Plex-friendly encoding, so once we've extracted the subtitles, we'll use Handbrake to reencode.
We perform this step first instead of jumping straight to Handbrake in order to move past one bottleneck of our pipeline: the IO cost of getting the data off the DVD. The later Handbrake processes will be much faster this way.
Steps:
- Open the
makemkvGUI. If you have a DVD in a drive, it will be automatically detected. - Before anything else, do
which ccextractorin your terminal, and enter this full path inView -> Preferences -> Advanced. You'll only need to do this once. - Click the drive image to "open" the DVD. This will take a few minutes.

- After excluding tracks for trailers / bonus content, click
Make MKVto save the DVD contents to your computer. This will take about 30 minutes.

Subtitle Extraction
You'll need: mkvinfo and mkvextract, both from the mkvtoolnix package.
We're looking to create an .srt file from what's available in the DVD. If we're lucky, it will provide one for us. Otherwise we'll need to do some conversion.
Extraction itself is easy. Let's first identify where the subtitles "are":
mkvinfo the-movie.mvk
SRT
mkvinfo will spit out a lot of information, but let's look for Track type:
subtitles. We're in luck if we see something like this:
| + Track
|  + Track number: 9 (track ID for mkvmerge & mkvextract: 8)
|  + Track UID: 9
|  + Track type: subtitles
|  + Default track flag: 0
|  + Lacing flag: 0
|  + Codec ID: S_TEXT/UTF8
|  + Language: eng
Notice the S_TEXT/UTF8. This subtitle is already an .srt, so let's grab it:
  > mkvextract tracks movie.mkv 8:movie.en.srt
  Extracting track 8 with the CodecID 'S_TEXT/UTF8'.
  Container format: SRT text subtitles
We can then check the output to see if it's what we expect:
  > head the-movie.en.srt
  1
  00:00:27,044 --> 00:00:31,947
  ♪

  2
  00:02:57,227 --> 00:02:59,527
  EXCUSE ME.

  3
  00:03:02,099 --> 00:03:05,167
Looks good.
VOBSUB, then SRT
If we found no S_TEXT/UTF8 entries, then we're stuck with VOBSUB, which is an image-based format. If used with Plex, it will force a Transcoding, so we'll convert it first. mkvinfo would show us something like:
  | + Track
  |  + Track number: 6 (track ID for mkvmerge & mkvextract: 5)
  |  + Track UID: 6
  |  + Track type: subtitles
  |  + Default track flag: 0
  |  + Lacing flag: 0
  |  + Codec ID: S_VOBSUB
  |  + Language: eng
  |  + Codec's private data: size 511
  > mkvextract tracks movie.mkv 5:movie.en.sub
  Extracting track 5 with the CodecID 'S_VOBSUB'.
  Container format: VobSubs
  Writing the VobSub index file 'movie.en.idx'.
Notice that it produces a .idx as well. Take both these files and visit subtitletools.com. Upload the files and wait for the conversion to complete. You now have your .srt! Note that you may have to make minor corrections yourself, where the image-to-text translation software misread the words.
Reencoding via Handbrake
You'll need: Handbrake.
Now for the fun part. Handbrake will take our "lossless" .mkv file, and with the settings I provide below, will reduce it to between 1gb and 2gb without significant quality loss. Further, its video and audio formats will be what Plex needs to avoid Transcoding.
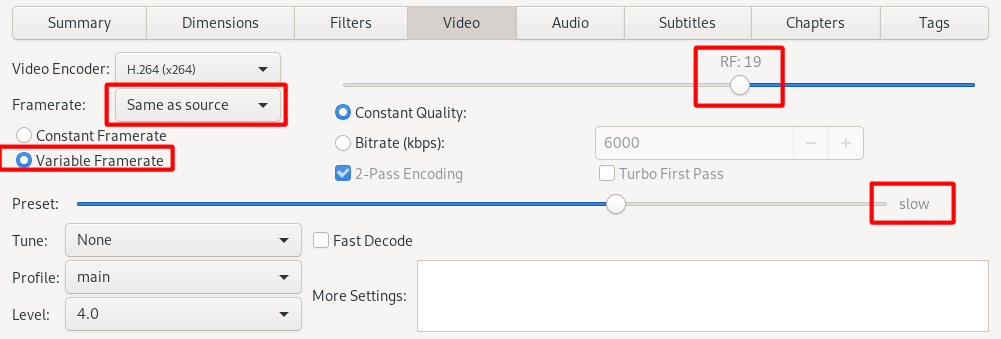
Preset
I choose the H.264 MKV 1080p30 preset as a starting point.

Video
The best way to avoid "fuzziness" in the resulting video is to stay as true as possible to the original data. Respecting the original frame rate has a big effect on this. Then, to increase quality overall, we reduce the RF and set our encoding speed to Slow. Leave everything else as the default values.
Audio
Audio is where we have to be careful. Here are the golden rules:
- Plex will never Direct Play if you have more than one audio track. No, this is not the MKV's fault. It will Direct Stream instead, which isn't as bad as full live Transcoding, but is still limiting.
- If you force Direct Play in your settings, you can't control which audio track gets selected. It will play whichever audio track appears first as determined by the original DVD.
- If your DVD came with AC3 5.1 audio, then Plex can Direct Play this and we don't need to reencode.
- If your DVD came with any other AC3 audio, then we do need to convert it, as shown below.

or

Subtitles
Since we're going to use external .srt files only, let's make sure we aren't wasting time with Handbrake's default language scan:

Metadata
To help Plex, we should set some metadata tags as well. If we don't set at least the title, the movie listing will display quite strangely in your Plex library.

After setting the output file name, we can hit Start to begin the encoding. This will take about an hour, which is worth it for the quality of video you get at the end. Waiting one hour once is better than rushing it, making mistakes, and needing to repeat the process.
Plex on a Pi
This section assumes you have a Raspberry Pi running Raspbian. You will need to have enabled ssh access in your settings, and you'll need to know the internal IP address of the Pi (check on your router's admin page). For serving media optimally, it's best if your Pi has a wired connection to your router. It's also assumed that you have an external hard drive for your media. It's not recommended to use the Pi's SD card for storing media.
Installing Plex
To install Plex on a Pi, follow the Preparing your Pi for Plex and Installing
Plex to your Raspberry Pi sections of this guide. My sections below handle drive permissions, which are often a problem.
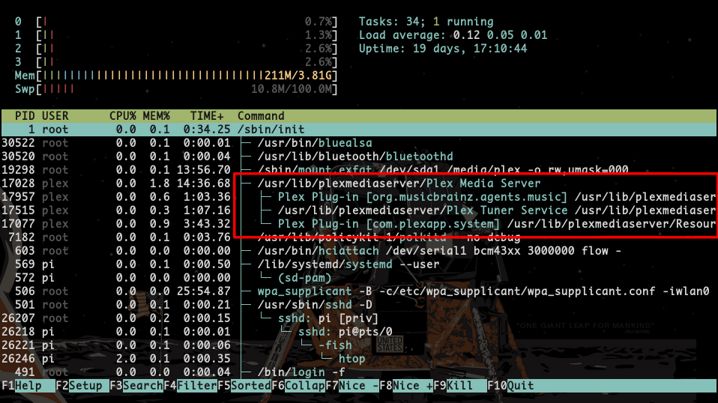
Consider also installing htop. We can then confirm that our Plex server is running as we expect:
Mounting your External Drive
Debian is convenient, in that it mounts drives for you as soon as you attach them. Unfortunately, it does so as the pi user. Our Plex server is running as the plex user, and needs full access to the drive.
First, let's find out where the drive is mounted. Let's ssh in:
ssh pi@192.168.0.<YOURPI>
Perform this command, and then attach your drive:
watch -n 1 "dmesg | tail -n 25"

Ah ha. Unmounting is easy: the device should appear in /media/pi/ already for us.
sudo umount /meda/pi/<YOURDEVICE>
Now let's remount it in a way that gives plex access:
sudo mount /dev/sda1 /media/plex/ -o umask=000
You will have to repeat this process whenever you restart your Raspberry Pi.
Directory Layout
Plex likes having your media categories separated. Here is how I split mine:
pi@plexpi /m/plex> pwd
/media/plex
pi@plexpi /m/plex> tree -L 1
.
├── anime
├── movies
├── music
├── podcasts
└── shows
For files with subtitles, I like to give them their own subfolder (e.g. movies/Hero/) as well, although this isn't strictly necessary.
Adding Libraries
Within Plex Web, visit Settings and go here:
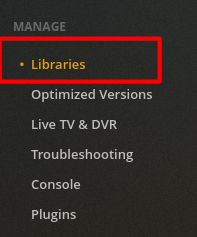
Click Add Library and follow the prompts. Your library for "Movies" would live in /media/plex/movies/, for example.
Copying Files to your External Drive
Naturally, you can detach the drive from your Pi and copy files to it from your main computer yourself. Or, if you don't want any Plex downtime, you can use scp to copy over the files you created in Handbrake:
scp Hero.mkv pi@192.168.0.<YOURPI>:/media/plex/movies
As soon as the copy is finished, Plex will detect the change and automatically update your Library. You should copy up your subtitles files in the same way, perhaps putting them in a subfolder with their video. Plex requires that they
have the exact same base name as the video they belong to, along with the language code. In the case of Hero, this would be Hero.en.srt for English subtitles.
Playback
We're almost there. Once we've confirmed a few final settings, we're free to enjoy our media!
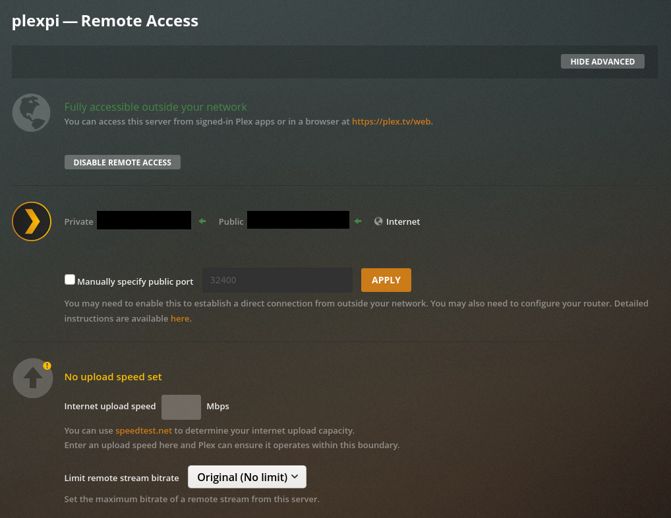
Plex Server Remote Settings
Confirm these settings.
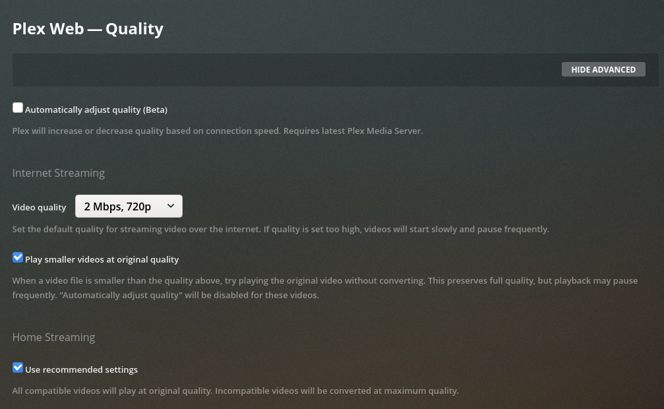
Plex Web Quality
Confirm these settings.
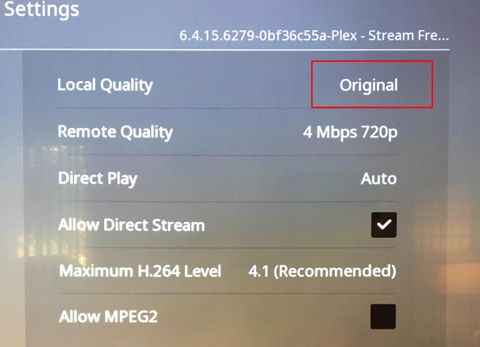
Roku Plex App
These are settings within the Plex app on your TV.
Quality
Quality can be maximum, since you're at home on the same network as the Pi.
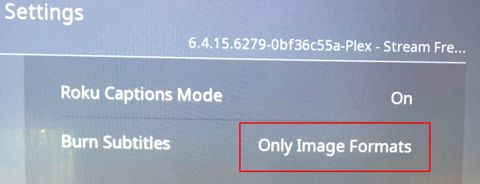
Subtitles
To make sure Plex doesn't get to excited and burn-in your subtitles even when it doesn't have to, we make sure this is set:
Conclusion
And that's it! Hopefully this guide will help you set up Plex and get media onto it efficiently, so that you, your friends, and your family can benefit from it.
I highly recommend getting a Plex Pass as well. The two biggest features that it unlocks for me are Media Downloading to your devices and a Dashboard that you can access in Plex Web, so that you don't need to ssh into your PR to monitor its health.
Happy streaming!
FAQ
How much can a Raspberry Pi handle?
Direct Play invokes essentially no CPU overhead, which is why all my settings above optimize for that. However, if something must be transcoded, my Raspberry Pi 4 (4 CPUs, 4gb RAM) can reliably handle one video at a time without any issues (buffering, etc.) on the client end.
Why is Plex transcoding!?
It seems everyone who runs a Plex Server hits this mystery. If you've followed my guide so far, then in theory your videos should never Transcode. If they are anyway, here are all the triggers I've discovered, and what I do to work around them:
- Plex doesn't like the video format.
- Use
.mkvor.mp4instead.
- Use
- Plex doesn't like the audio format.
- Encode the audio as AAC to be safe.
- You have more than one audio track.
- Encode only a single track within Handbrake.
- You're playing remotely.
- All bets are off here. Sometimes it seems to Direct Play, sometimes it doesn't. The quality of your connection can affect this.
- You're on a mobile device.
- Almost certainly Plex is lowering the quality to fit the device. If you have a Plex Pass, you can download the media to your device beforehand.
- You're using image-based subtitles.
- Only use external
.srtsubtitles.
- Only use external
- Your
.srtlanguage specification (say,.ja.srt) is for a non-ASCII language. Plex detects this and burns them in automatically.- Use Chromecast or Plex Web to manage the playback instead.
If you're desperate to stop Plex from transcoding video, you can tell it not to under Settings -> Transcoder:
![]()
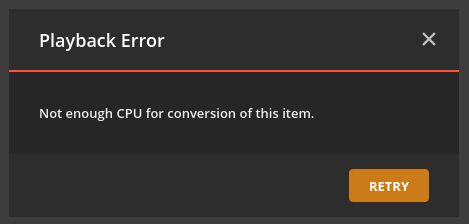
Be warned, however, that while playing remotely you might get this funny message:
Why do UTF8 characters appear as boxes on my Roku TV?
Roku TVs don't support anything but Latin characters, and there is no way to install extra fonts yourself. However, if you have a Chromecast, you can instead cast your media to it via the Plex-Chromecast integration, and the UTF8 will display correctly. It will also display correctly in Plex Web.
Alternatively, you can choose to force Plex to burn-in the subtitles. This will inject the UTF8 characters on Plex's end, but will cause Transcoding.
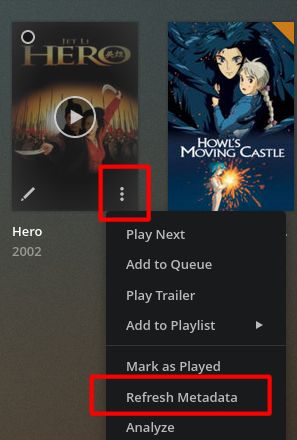
I added a subtitle file but Plex doesn't see it...
You just need to fresh the metadata for that Library entry:
Resources
- Plex Docs: Supported Plex Media Formats
- Plex Docs: Configuring the Plex Transcoder
- Plex Docs: Adding Local Subtitles to your Media
- Plex Docs: Scanning vs Refreshing a Library
- Plex Forums: Best Formats for Plex and Roku
- Plex Forums: .srt subtitles not detected
- Plex Forums: Roku app sucks with SRT subtitles
- Reddit: How to get subtitles without transcoding?
- Reddit: Best transcoding settings in Handbrake for Plex?
- Reddit: Why is the audio transcoding?
- Reddit: Why is Plex transcoding?
- Roku: Arabic subtitles just show squares on TV
- Stack Exchange: Extracing subtitles from MKV files
- How to Set up a Raspberry Pi Plex Server
- Subtitle Conversion Tool
- Subtitle Best Practices